
How to: Apple Mac DEP enrollment with Jamf and NoMAD Login
Recently, with help from my good colleges, we finally managed to to configure a working enrollment workflow with Jamf for our DEP Mac’s. Since we had quite a struggle I would like to help others out there by documenting our configuration.
Scope
If you follow this guide, you will be able to deploy Macs with Jamf via DEP enrollments, where the user account is created with NoMAD Login. The NoMAD agent will then be able to automatically log in when the user signs in. After the first log in, NoMAD Login is removed and the user will only see the default sign in screen.
Note. Instructions in this article is not compatible with NoMAD Login+ Okta, but NoMAD Login AD only.
Components used:
- Jamf Pro Cloud
- Apple Device Enrollment Program / Business Manager (DEP)
- NoMAD
- NoMAD Login AD (NoLo)
Prerequisites:
- Jamf Pro
- DEP assignment with Prestage Enrollment is configured in Jamf
- Enrolled Macs can communicate with your on-prem AD LDAP for user authentication
- Login hooks configures in Jamf
Prestage Enrollment
In Jamf Pro, in your Prestage Enrollment profile under “General”, make sure “Require Authentication” is deactivated. This is not a requirement, but making the user authenticate here can be unnecessary since NoLo will authenticate the user anyway.

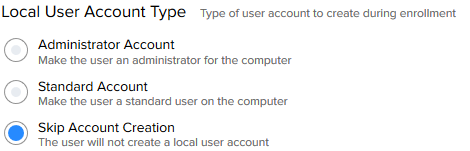
Under “Account Settings”, select “Skip Account Creation” under the “Local User Account Type” section. This is because we want NoLo to create the user account. You only see the “Require Authentication” option if LDAP is configured in Jamf.
Policies
Now move over to the Policies section in Jamf. We will create tree policies for this configuration.
#1 – Install and Launch NoMAD Login
Download and extract the NoMAD Login zip. Using Jamf Composer, create a .pkg that places the evaluate-mechanisms from the zip in a location of your liking on your Mac. What you want to accomplish is to get the evaluate-mechanisms folder somewhere reachable on your clients since it contains some important parts. If you never used Composer before, you basically take a snapshot of your Mac, then move the evaluate-mechanisms folder to your desired location, and take another snapshot. Composer will then see differences between the first and last snapshot and let you make that into an .pkg that you can install on other Macs using Jamf policies.
Upload your composer created .pkg and the NoMADLoginAD-1.2.1.pkg from the zip file to your Jamf package repository. Note that the version number might be different when you read this, but it is important that you don’t take the file that ends with “authchanger”.
Now we must create a script in Jamf. Copy the script from below, and change values to suite your environment. You can see the complete preference list with explanations here.
#!/bin/bash

# Preference key reference
# https://gitlab.com/orchardandgrove-oss/NoMADLogin-AD/wikis/Configuration/preferences
domain="lab.domain.com"
keychain_add="YES"
logo="/local/path/to/image/on/mac/clients.png"
login_screen="NO"
admin="YES"
userplaceholder="Corporate username"

# Set default AD domain
defaults write /Library/Preferences/menu.nomad.login.ad.plist ADDomain "$domain"

# Set login window logo
defaults write /Library/Preferences/menu.nomad.login.ad.plist LoginLogo "$logo"

# Username placeholder
defaults write /Library/Preferences/menu.nomad.login.ad.plist UsernameFieldPlaceholder -string "$userplaceholder"

# Enable user as admin
defaults write /Library/Preferences/menu.nomad.login.ad.plist CreateAdminUser -bool "$admin"

# Enable or disable login screen
defaults write /Library/Preferences/menu.nomad.login.ad.plist LoginScreen -bool "$login_screen"

# Adds a NoMAD entry into the keychain
defaults write /Library/Preferences/menu.nomad.login.ad.plist KeychainAddNoMAD -bool "$keychain_add"

# Should NoLo create a Keychain if none exists
defaults write /Library/Preferences/menu.nomad.login.ad.plist KeychainCreate -bool "$keychain_add"

# Set security authorization database mechanisms with authchanger
/usr/local/bin/authchanger -reset -AD

# Kill loginwindow process to force NoMAD Login to launch
/usr/bin/killall -HUP loginwindow

exit 0
Now bring both packages you uploaded to Jamf and the script into a policy. Set the Trigger to “Enrollment Complete”, and the Execution Frequency to “Once per computer”.
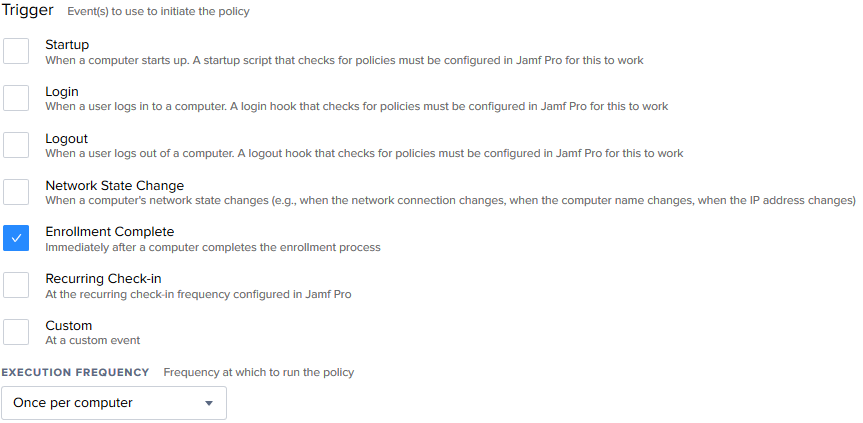
Under Scope, you could select “All computers” if you just use DEP to enroll, or create a smart group that will pick up on Macs that are DEP enrolled.
This policy will now install NoLo with your preferences when enrollment is complete, and then replace the default login screen with NoLo, so the user must authenticate against your AD, and after a successful authentication, their user will be created and signed into.
#2 – NoMAD Install
Download NoMAD and NoMAD LaunchAgent. Upload them to your Jamf repository. Create a policy that install both packages, with “Login” as Trigger, Execution Frequency as “Once per computer”, and the same Scope as the first policy we created.
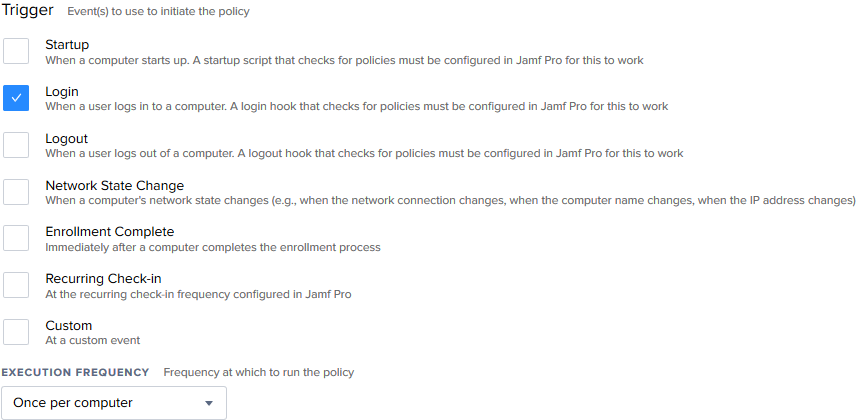
This policy will install NoMAD and make sure it will launch each time a user logs in, since we installed the NoMAD LauncAgent as well.
#3 – Remove NoMAD Login via evaluate-mechanisms
We only want NoLo to be used for initial user creation, and go away when its job is done. To do this we must create another script.
#!/bin/bash

# NoMAD Login Cleanup

cd /local/path/on/Mac/to/evaluate-mechanisms/
sudo ./resetDB.bash

exit 0;
Use the same Trigger, Execution Frequency and Scope as the previous policy.
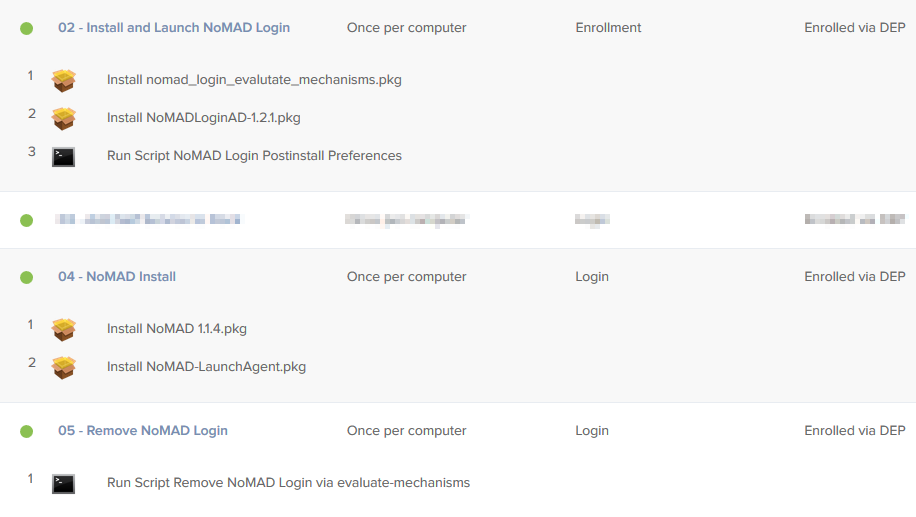
You should now have 3 policies as shown below. I censored one policy since it was not relevant to this How To.
Configuration Profile
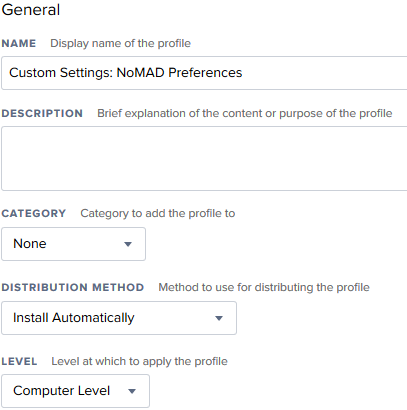
We need to configure the NoMAD installation. This is done with a Configuration Profile. Head over to the “Configuration Profile” section in Jamf and create a new Profile. Configure the “General” section as shown below.
In the “Custom Setting” section, write com.trusourcelabs.NoMAD in the “Preference Domain”.

Click the “UPLOAD_FIELD_CUSTOM_SETTINGS_FILENAME” button and upload your plist file, containt your NoMAD config. You can customize the code below to your needs and save it as a plist-file.
<?xml version="1.0" encoding="UTF-8"?>
<!DOCTYPE plist PUBLIC "-//Apple//DTD PLIST 1.0//EN" "http://www.apple.com/DTDs/PropertyList-1.0.dtd">
<plist version="1.0">
<dict>
<key>ADDomain</key>
<string>lab.domain.com</string>
<key>RenewTickets</key>
<string>1</string>
<key>SecondsToRenew</key>
<string>7200</string>
<key>ShowHome</key>
<string>0</string>
<key>Template</key>
<string>User Auth</string>
<key>UseKeychain</key>
<string>1</string>
<key>UseKeychainPrompt</key>
<string>true</string>
<key>Verbose</key>
<string>0</string>
<key>GetHelpType</key>
<string>URL</string>
<key>LocalPasswordSync</key>
<string>true</string>
<key>LocalPasswordSyncOnMatchOnly</key>
<string>true</string>
<key>LDAPOverSSL</key>
<string>true</string>
<key>SignInWindowOnLaunch</key>
<string>false</string>
</dict>
</plist>
Scope the Configuration Profile to the same as you did with the policy that installed NoMAD (#2 – NoMAD Install).
That’s it!
Macs that enroll to Jamf via DEP will now get NoLo for the initial user authentication and creation, be removed and replaced with the default login window after the first login trigger, and the NoMAD agent will automatically sign in without user intervention.
If you have questions, you can send me a message from my contact page, or join the community at MacAdmins in slack.
Acknowledgements and references
Most of my knowledge in this article is based on NoMAD documentation (NoMAD / NoMAD Login), articles by Nathaniel Strauss (1 / 2), the fine people in the MacAdmins Slack channel and the help from Bror and Remi. 🙂
Thanks everyone!